Onboarding Walkthrough
A step-by-step guide through the 5-by-5 setup wizard for new groups and solo accounts.
Overview
When you create a new group or solo account, 5-by-5 walks you through a multi-step setup wizard. The steps vary slightly depending on whether you’re setting up a Club account (with multiple members) or a Solo account (single pilot), but the core flow is the same.
If you’re joining an existing group, you’ll only complete the member-specific steps (profile, pilot currency) — the group and aircraft are already configured by your group owner.
Step 1: Account Type
Choose how you’ll use 5-by-5:
- Group / Club — you share the airplane with one or more other pilots
- Solo — you are the sole owner and pilot
This selection determines which features are available and how certain screens are labelled throughout the app. You can always start Solo and migrate to a Club plan later if your situation changes.
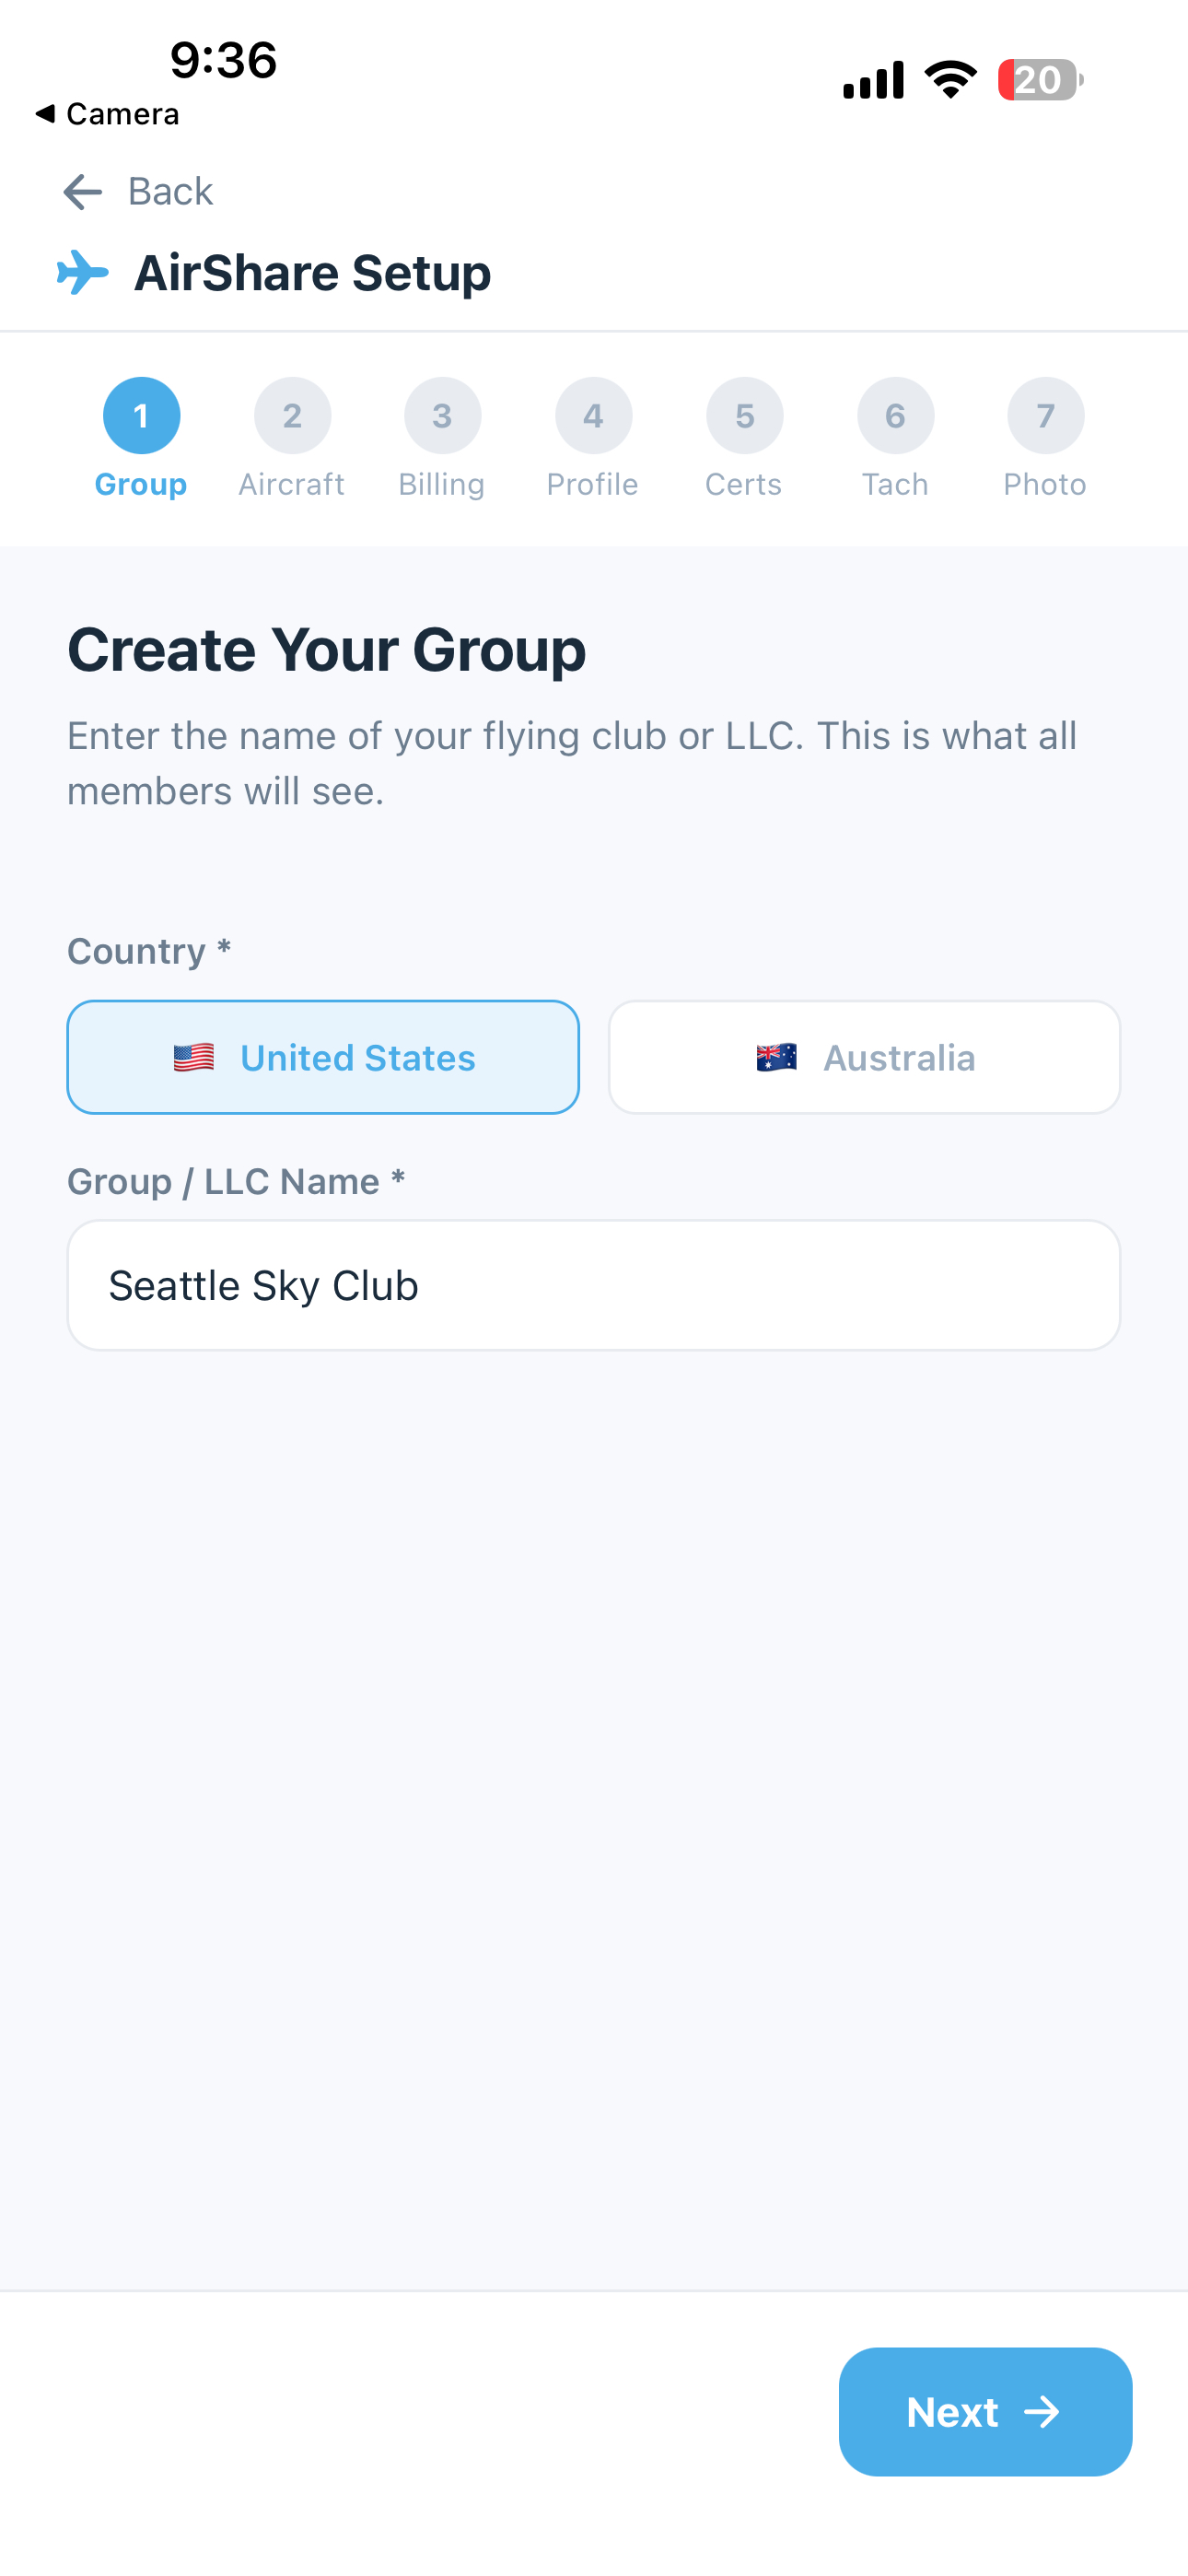
Step 2: Group or Account Name
- Group / Club accounts — enter your flying club or partnership name as it will appear to all members (e.g., “Rainier Flyers LLC”)
- Solo accounts — enter your account name, typically your own name or the name of your ownership entity
This name appears in the app header, on the web dashboard, and in invoice and payment receipt emails.
Country
A country toggle appears on this step pre-selected based on your device’s locale — a US-locale phone defaults to United States, an AU-locale phone defaults to Australia. You can tap the other option to override.
In most cases you won’t need to: the home airport you enter on the next step automatically snaps the country to match the airport’s location. So entering KRNT sets the group to US settings, YSSY to AU — regardless of what the device locale said.
Country affects:
- Phone number formatting — display and validation
- Sales tax handling — US state-level taxes vs. Australian GST
- Date format — MM/DD/YYYY (US) vs. DD/MM/YYYY (AU)
- Currency display — USD ($) vs. AUD ($A)
- Regulation references — 14 CFR (US) vs. CASR Part 61 (AU)
You can change country later in Settings > Group > Country — it’s a regular dropdown. After switching, double-check your sales tax authorities in Settings, since the rates and labels are country-specific.
For mixed groups: If your aircraft is based in one country but a member lives in another, country follows where the aircraft is based. The member's personal phone formatting follows the group, not the member.
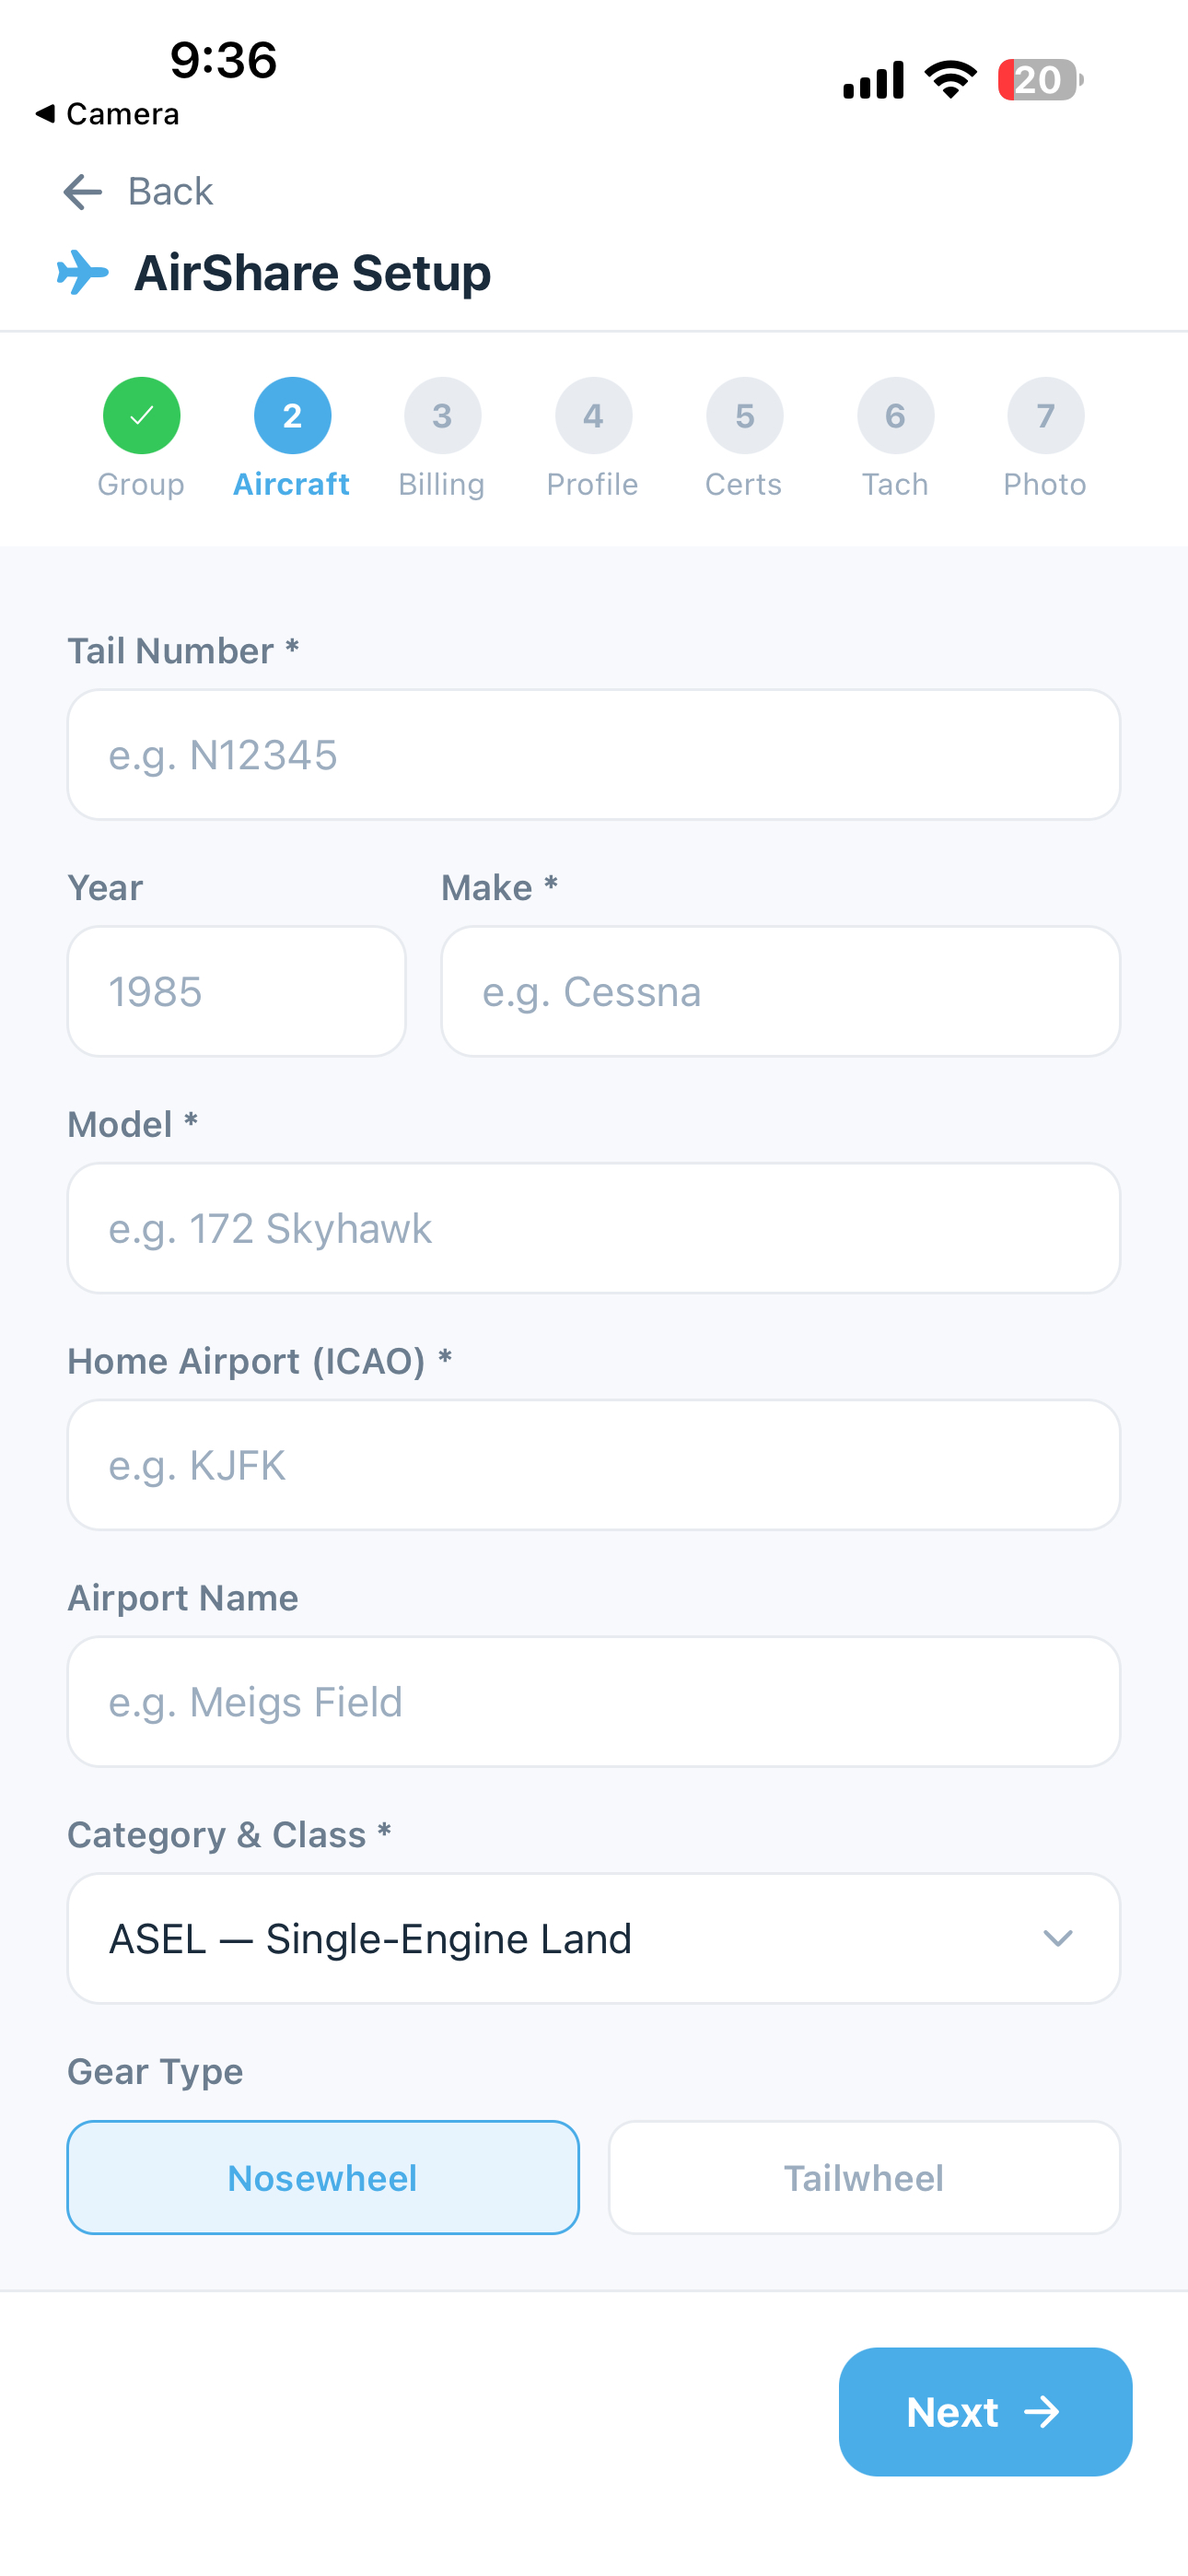
Step 3: Aircraft Info
- Tail number — your aircraft’s registration (e.g., N236RB for US, VH-ABC for AU). Enter the full registration including any leading letters.
- Year, make, model — selected from the shared Aircraft Catalog dropdown menus. Make and model are used to automatically find applicable Airworthiness Directives (ADs) and to default sensible cruise/category settings. If your exact make/model isn’t in the catalog, choose Other and we’ll work to add it.
- Engine make and model — also used for engine-specific AD lookups
- Home airport — enter the ICAO identifier (e.g., KRNT, YSSY) and 5-by-5 looks up the airport name, automatically sets your timezone, and snaps your group’s country to match the airport’s country. So entering
KRNTpins the group to US settings;YSSYpins it to AU. - Category/Class — e.g., ASEL, AMEL. Used for pilot currency tracking.
- Gear type — Nosewheel or Tailwheel. Tailwheel aircraft require full-stop landings for day passenger-carrying currency under US 14 CFR 61.57(a).
- Cruise speed — used to estimate flight times in the booking and flight log screens
How does the engine track time? 5-by-5 supports three time-tracking modes: Tach, Hobbs, and Airswitch. This setting isn't part of onboarding — you'll configure it in Settings > Aircraft > Time Tracking after setup. See Settings for details.
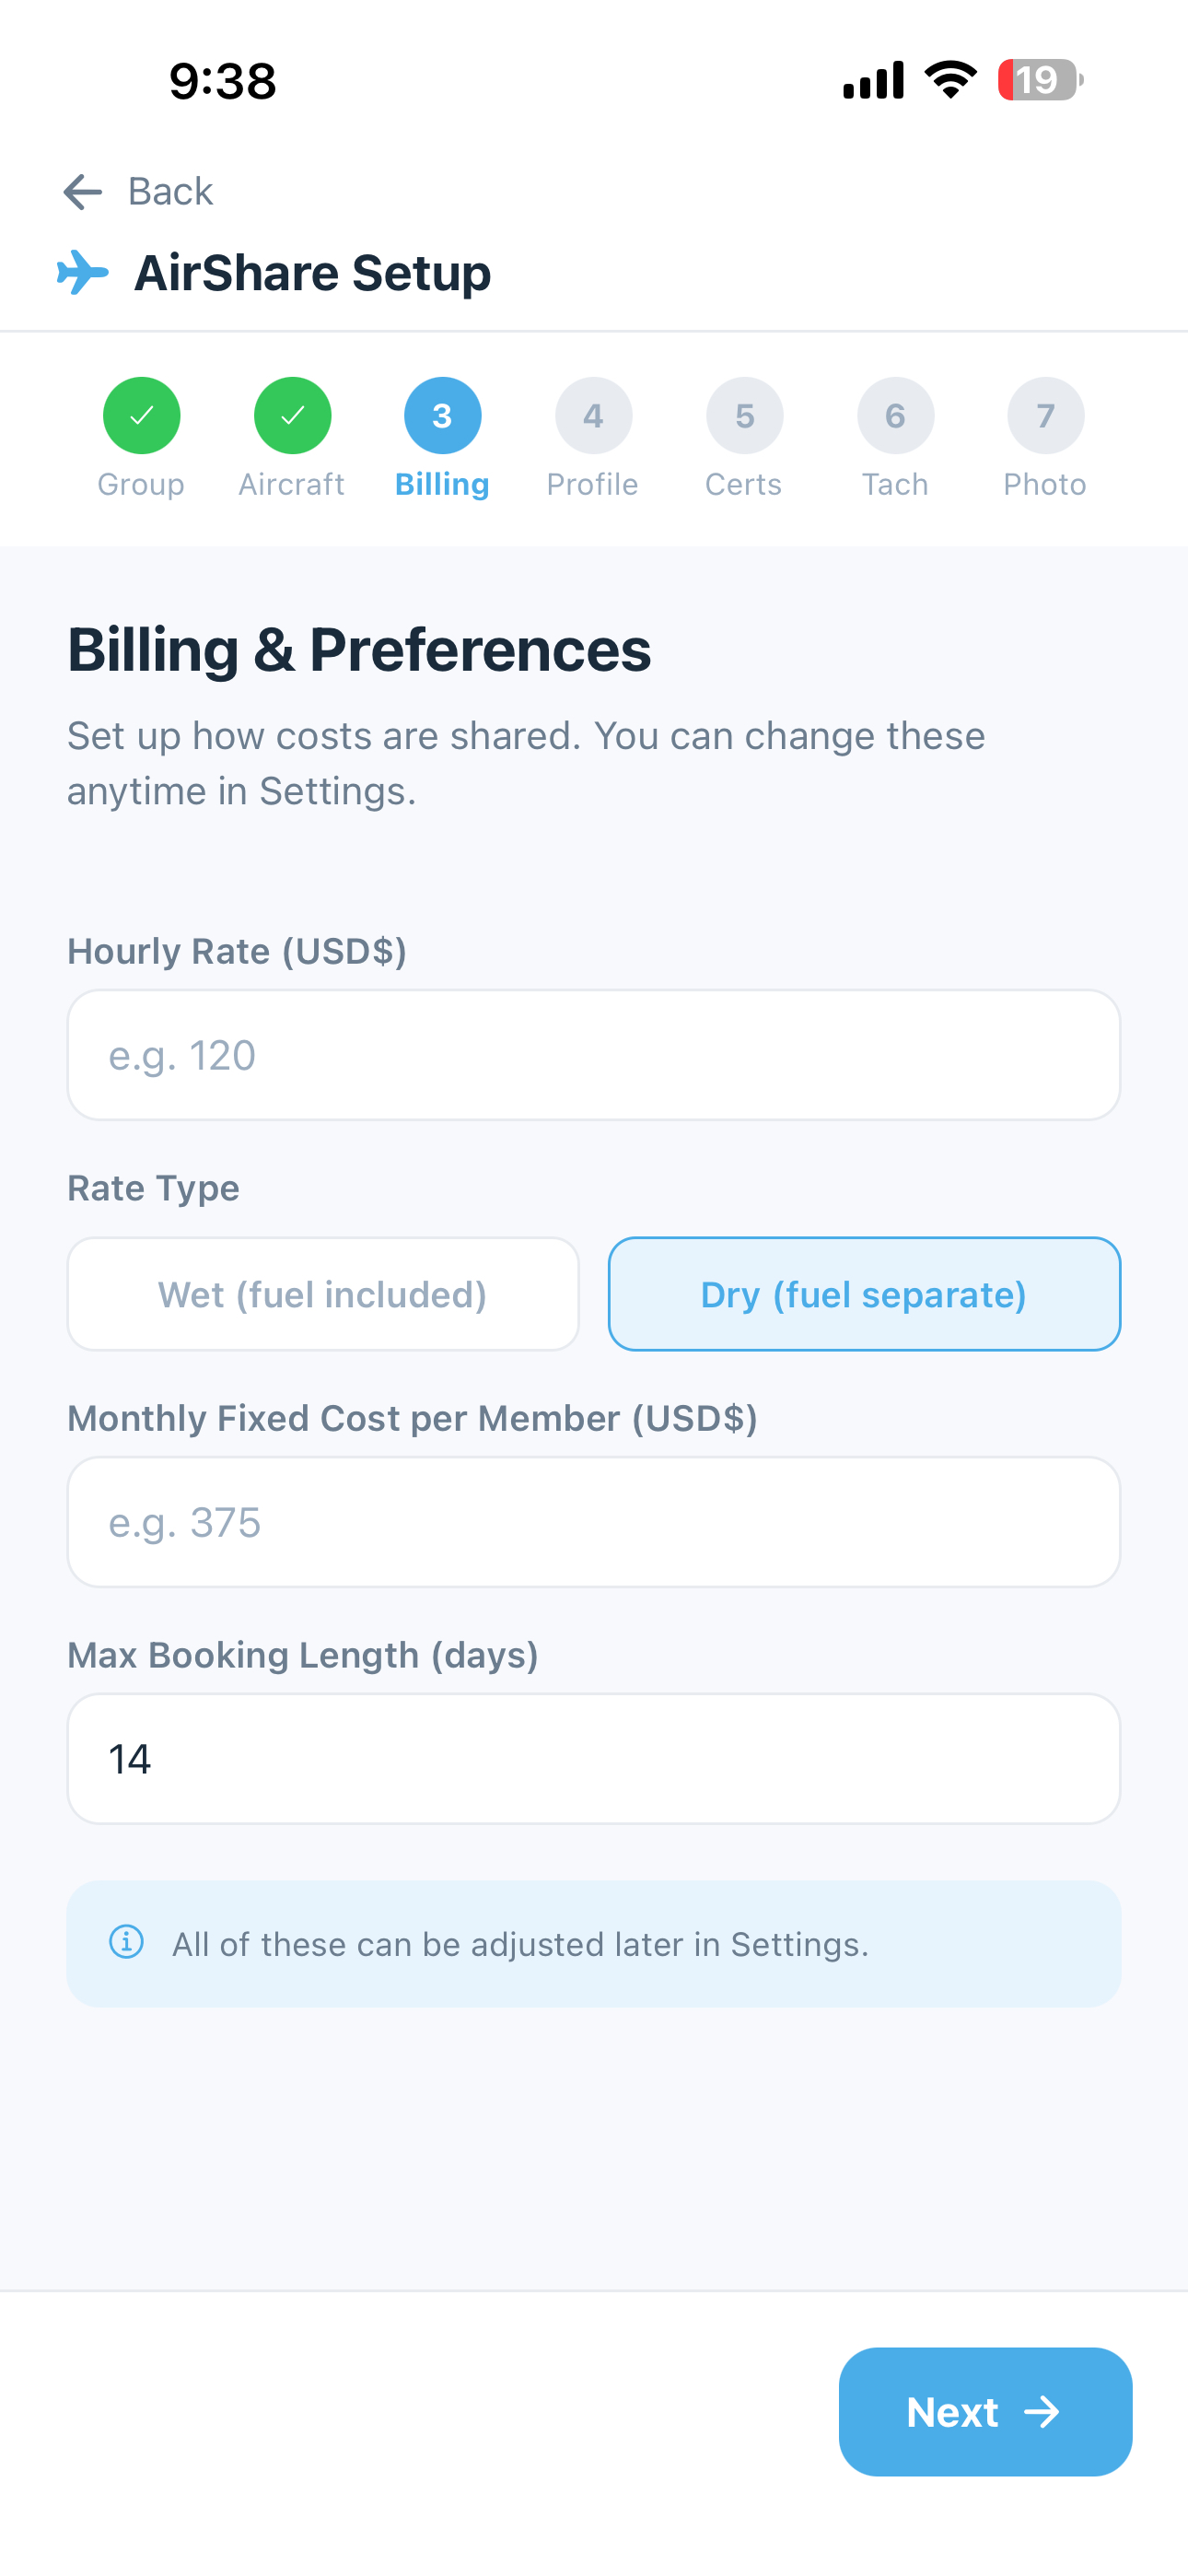
Step 4: Billing & Preferences (Club plans only)
These settings control how 5-by-5 calculates estimated monthly costs for each member. All can be adjusted later in Settings.
- Hourly Rate — the per-hour rate your group charges for flying time, calculated from tach time
- Rate Type — Wet (fuel included in the hourly rate) or Dry (fuel billed separately)
- Monthly Fixed Cost per Member — a fixed amount billed to each member every month for shared expenses such as hangar rent, insurance, annual reserve, and engine reserve. This is in addition to their hourly charges. You can refine this into a per-line-item breakdown later (e.g., “$450 hangar, $200 insurance, $100 reserve”) in Settings. See Settings and Finances for details.
For infrequent fliers: If your group has a member who only flies occasionally and you'd rather they pay just for their flight hours without contributing to the monthly fixed share, you can mark them as Hourly billing only on their member card after you've invited them. They're then excluded from the fixed-cost denominator entirely. See Members & Roles > Hourly-Only Members for the per-member toggle.
Tip: Don't stress over getting these numbers perfect during setup — you can update them any time in Settings. It's more important to get flying and adjust as you go.
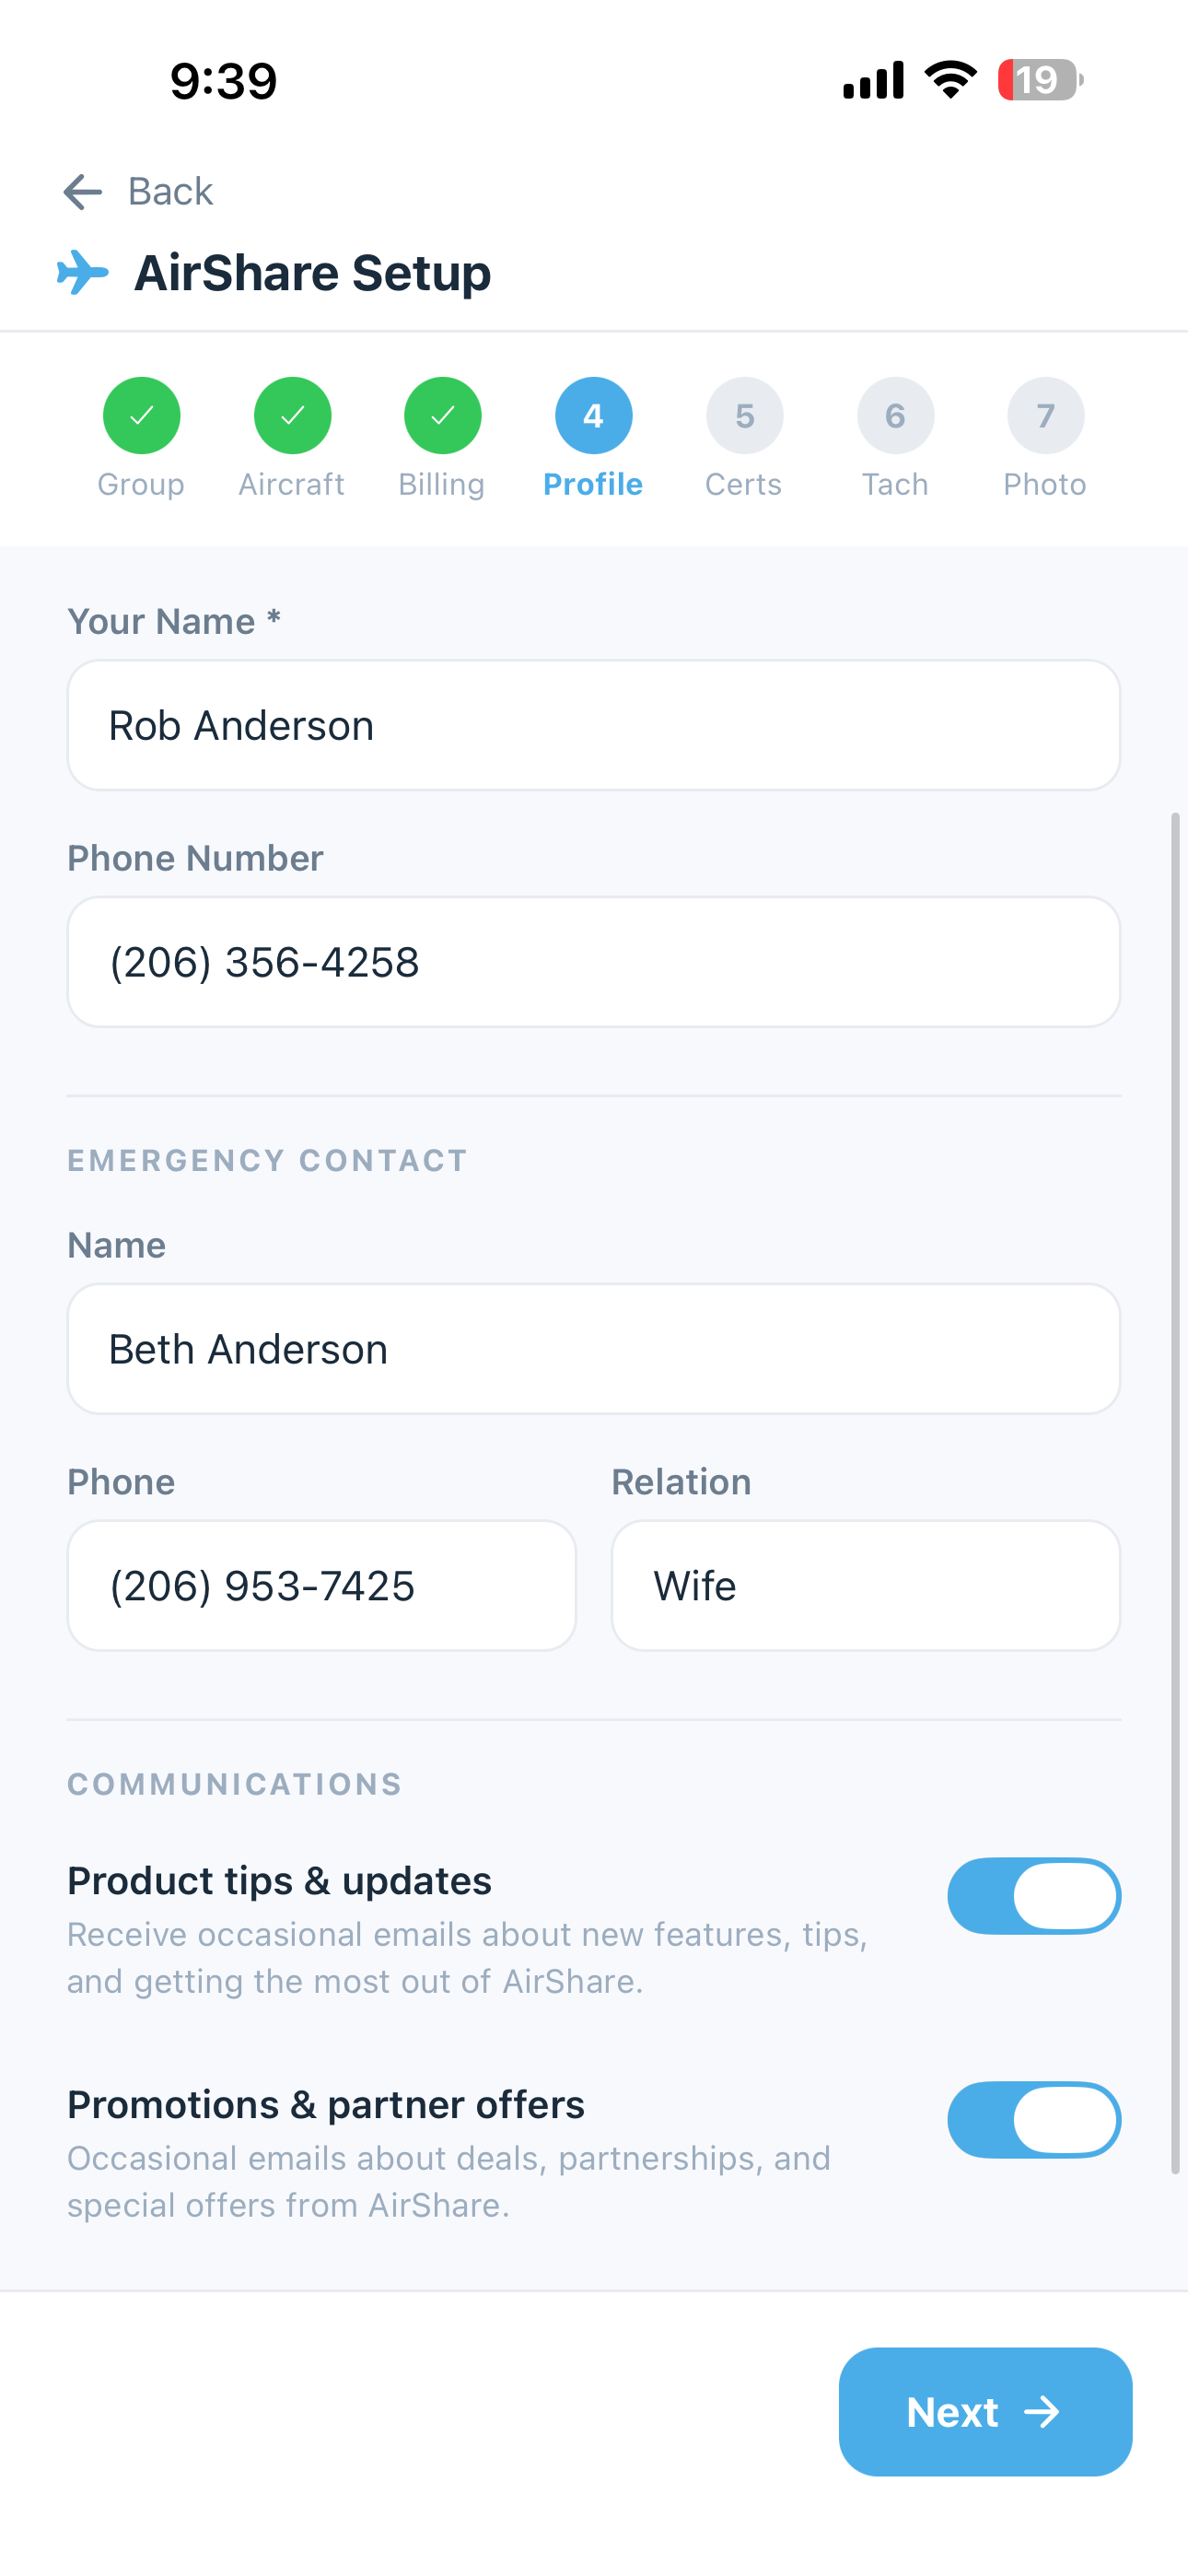
Step 5: Your Profile
- Your name — how you’ll appear to other group members
- Phone number — for quick contact from the Members screen
- Emergency contact — name, phone number, and relationship. This is visible to other group members in case of emergency.
Communications preferences:
- Product tips & updates — periodic emails about new features and getting the most out of 5-by-5. On by default.
- Promotions & partner offers — occasional emails about deals or partner offers we think you’d find genuinely valuable. We don’t sell your data. Off by default.
Transactional emails (invoices, payment receipts, squawk alerts) cannot be disabled — they’re required for the product to function. See Email Notifications for the full email list.
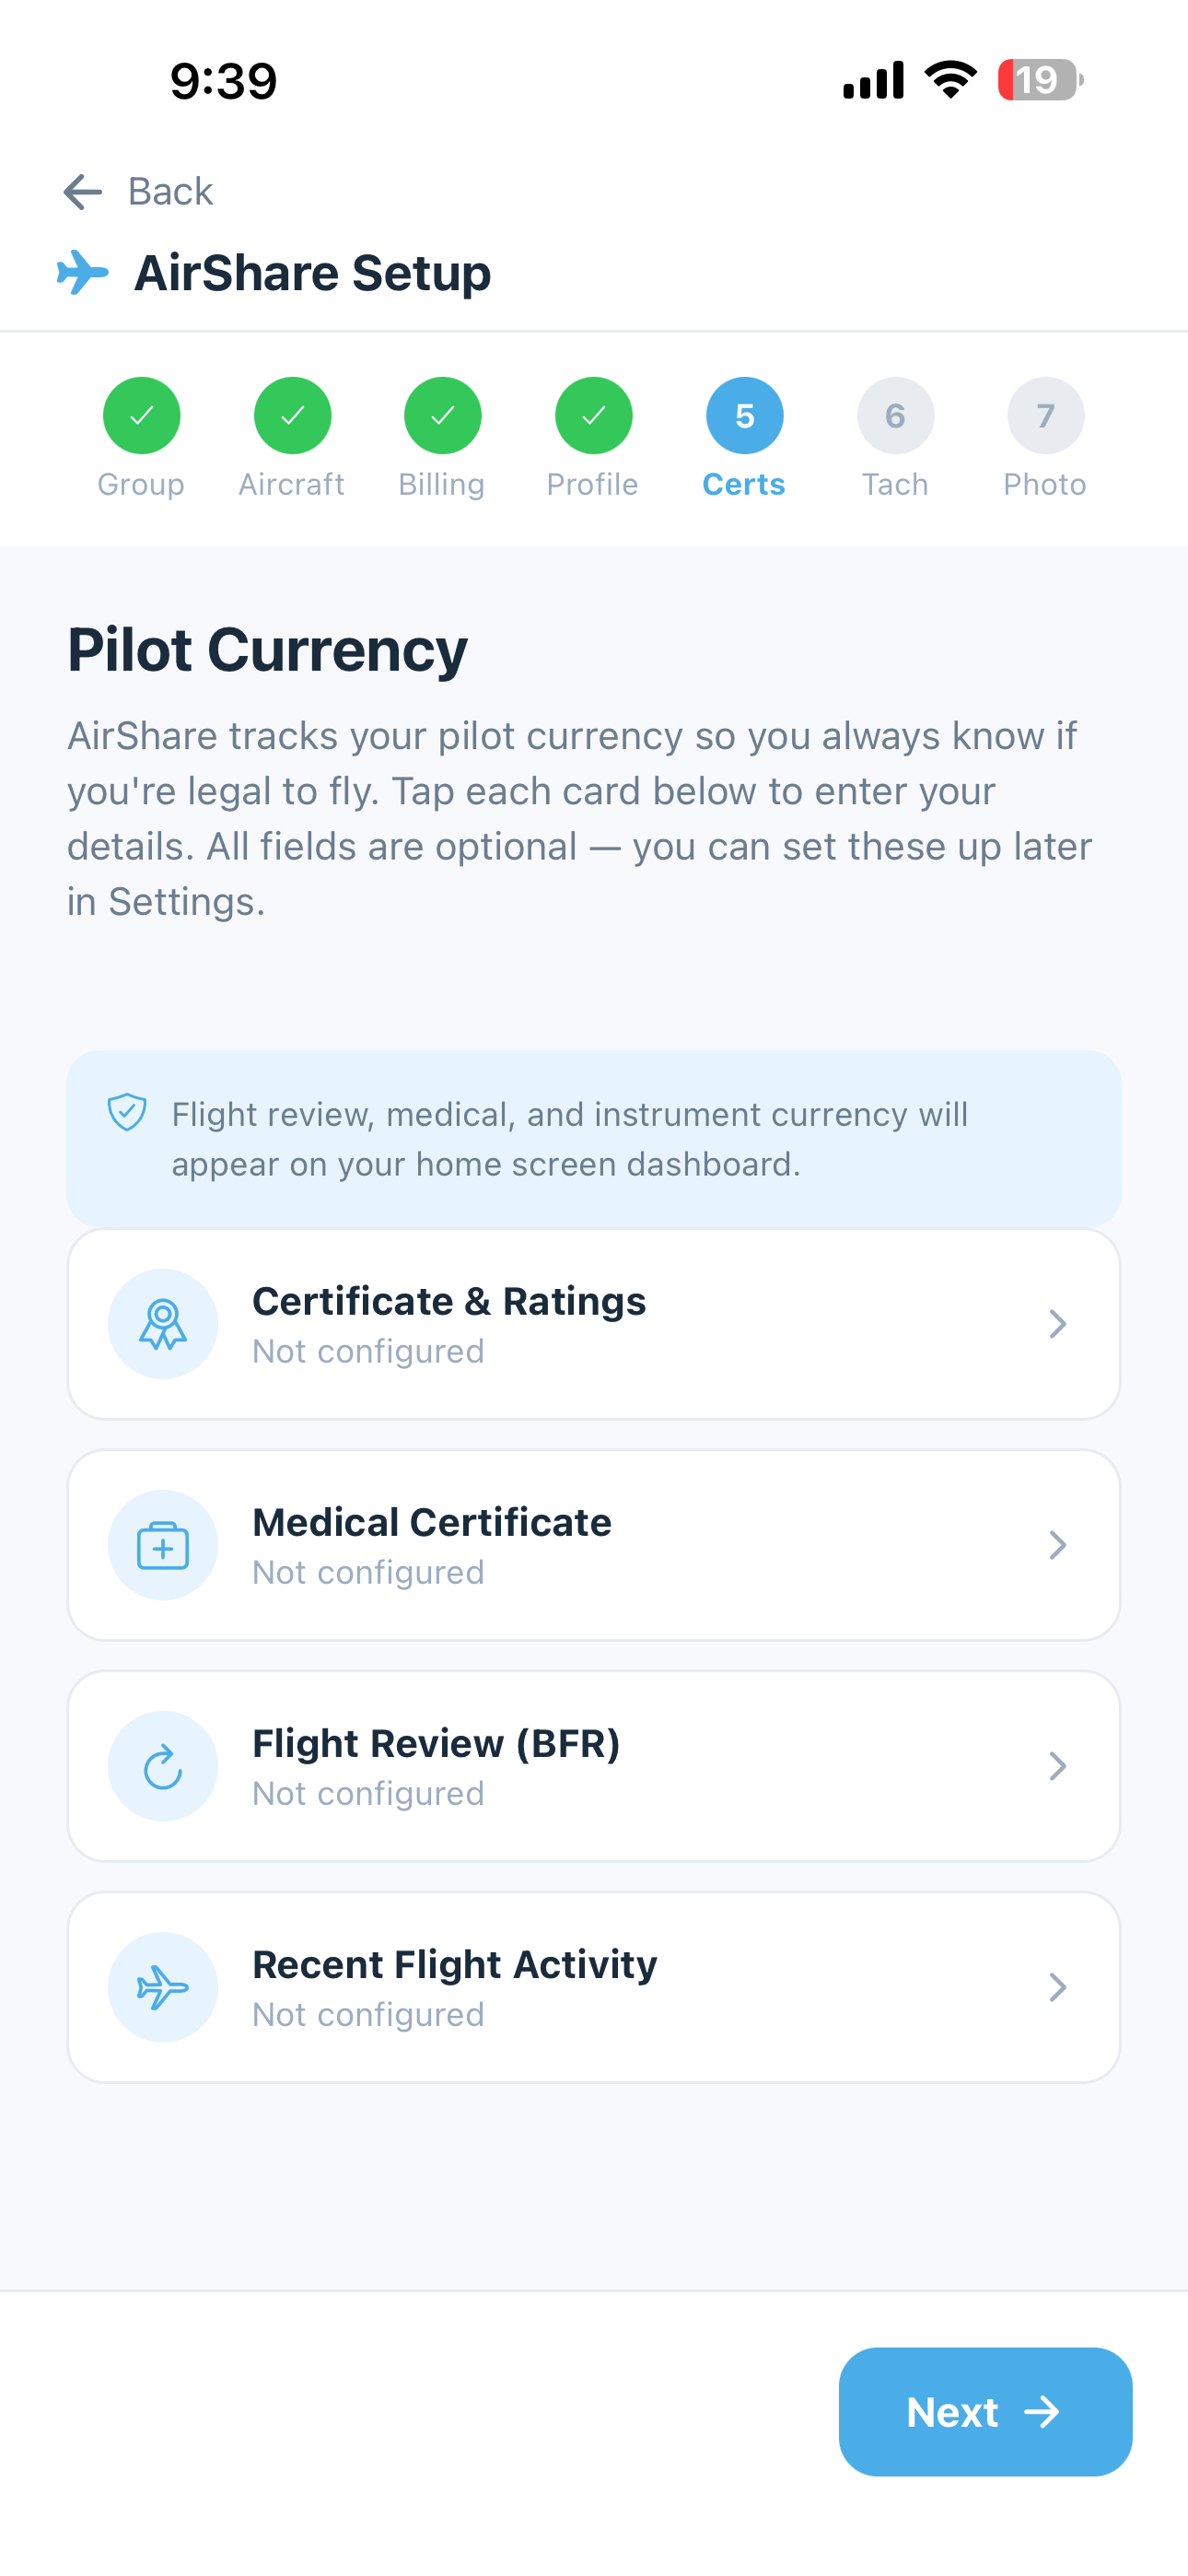
Step 6: Pilot Currency
Enter your certificate and currency information so 5-by-5 can track your flying status. The options shown follow your group’s country — US groups see FAA terminology; AU groups see CASA terminology.
Certificates / Licences:
- US: Student, Sport, Recreational, Private, Commercial, ATP
- AU: Student, Recreational (RPL), Private (PPL), Commercial (CPL), Air Transport (ATPL), Multi-crew (MPL)
Ratings & endorsements:
- US: SEL, MEL, SES, MES, Instrument, CFI, CFII, MEI, Glider, Rotorcraft
- AU: SEA, MEA, Instrument Rating, Private Instrument Rating (PIR), Night VFR, Flight Instructor, Tailwheel, Retractable Gear, Constant Speed Prop, Aerobatics, Formation, Low Level, Aerial Application
Select all ratings that apply.
Medical certificate:
- US: Class 1, Class 2, Class 3, BasicMed
- AU: Class 1, Class 2, Basic Class 2, RAMPC (RPL), Class 5 (self-declaration)
Key dates:
- Medical certificate expiration — 5-by-5 tracks this and warns you as it approaches
- Flight Review / BFR (US) or AFR (AU) — your most recent flight review. US BFR is biennial; AU AFR varies by licence (PPL/RPL is 24 months, CPL/MPL/ATPL may follow OPC schedules instead).
- Last IPC date (paid plans) — your most recent Instrument Proficiency Check, used to reset instrument currency
Recent flight activity — enter recent landings and instrument approaches to establish a baseline for your currency calculations. After this point, flights you log in 5-by-5 will keep your currency up to date automatically.
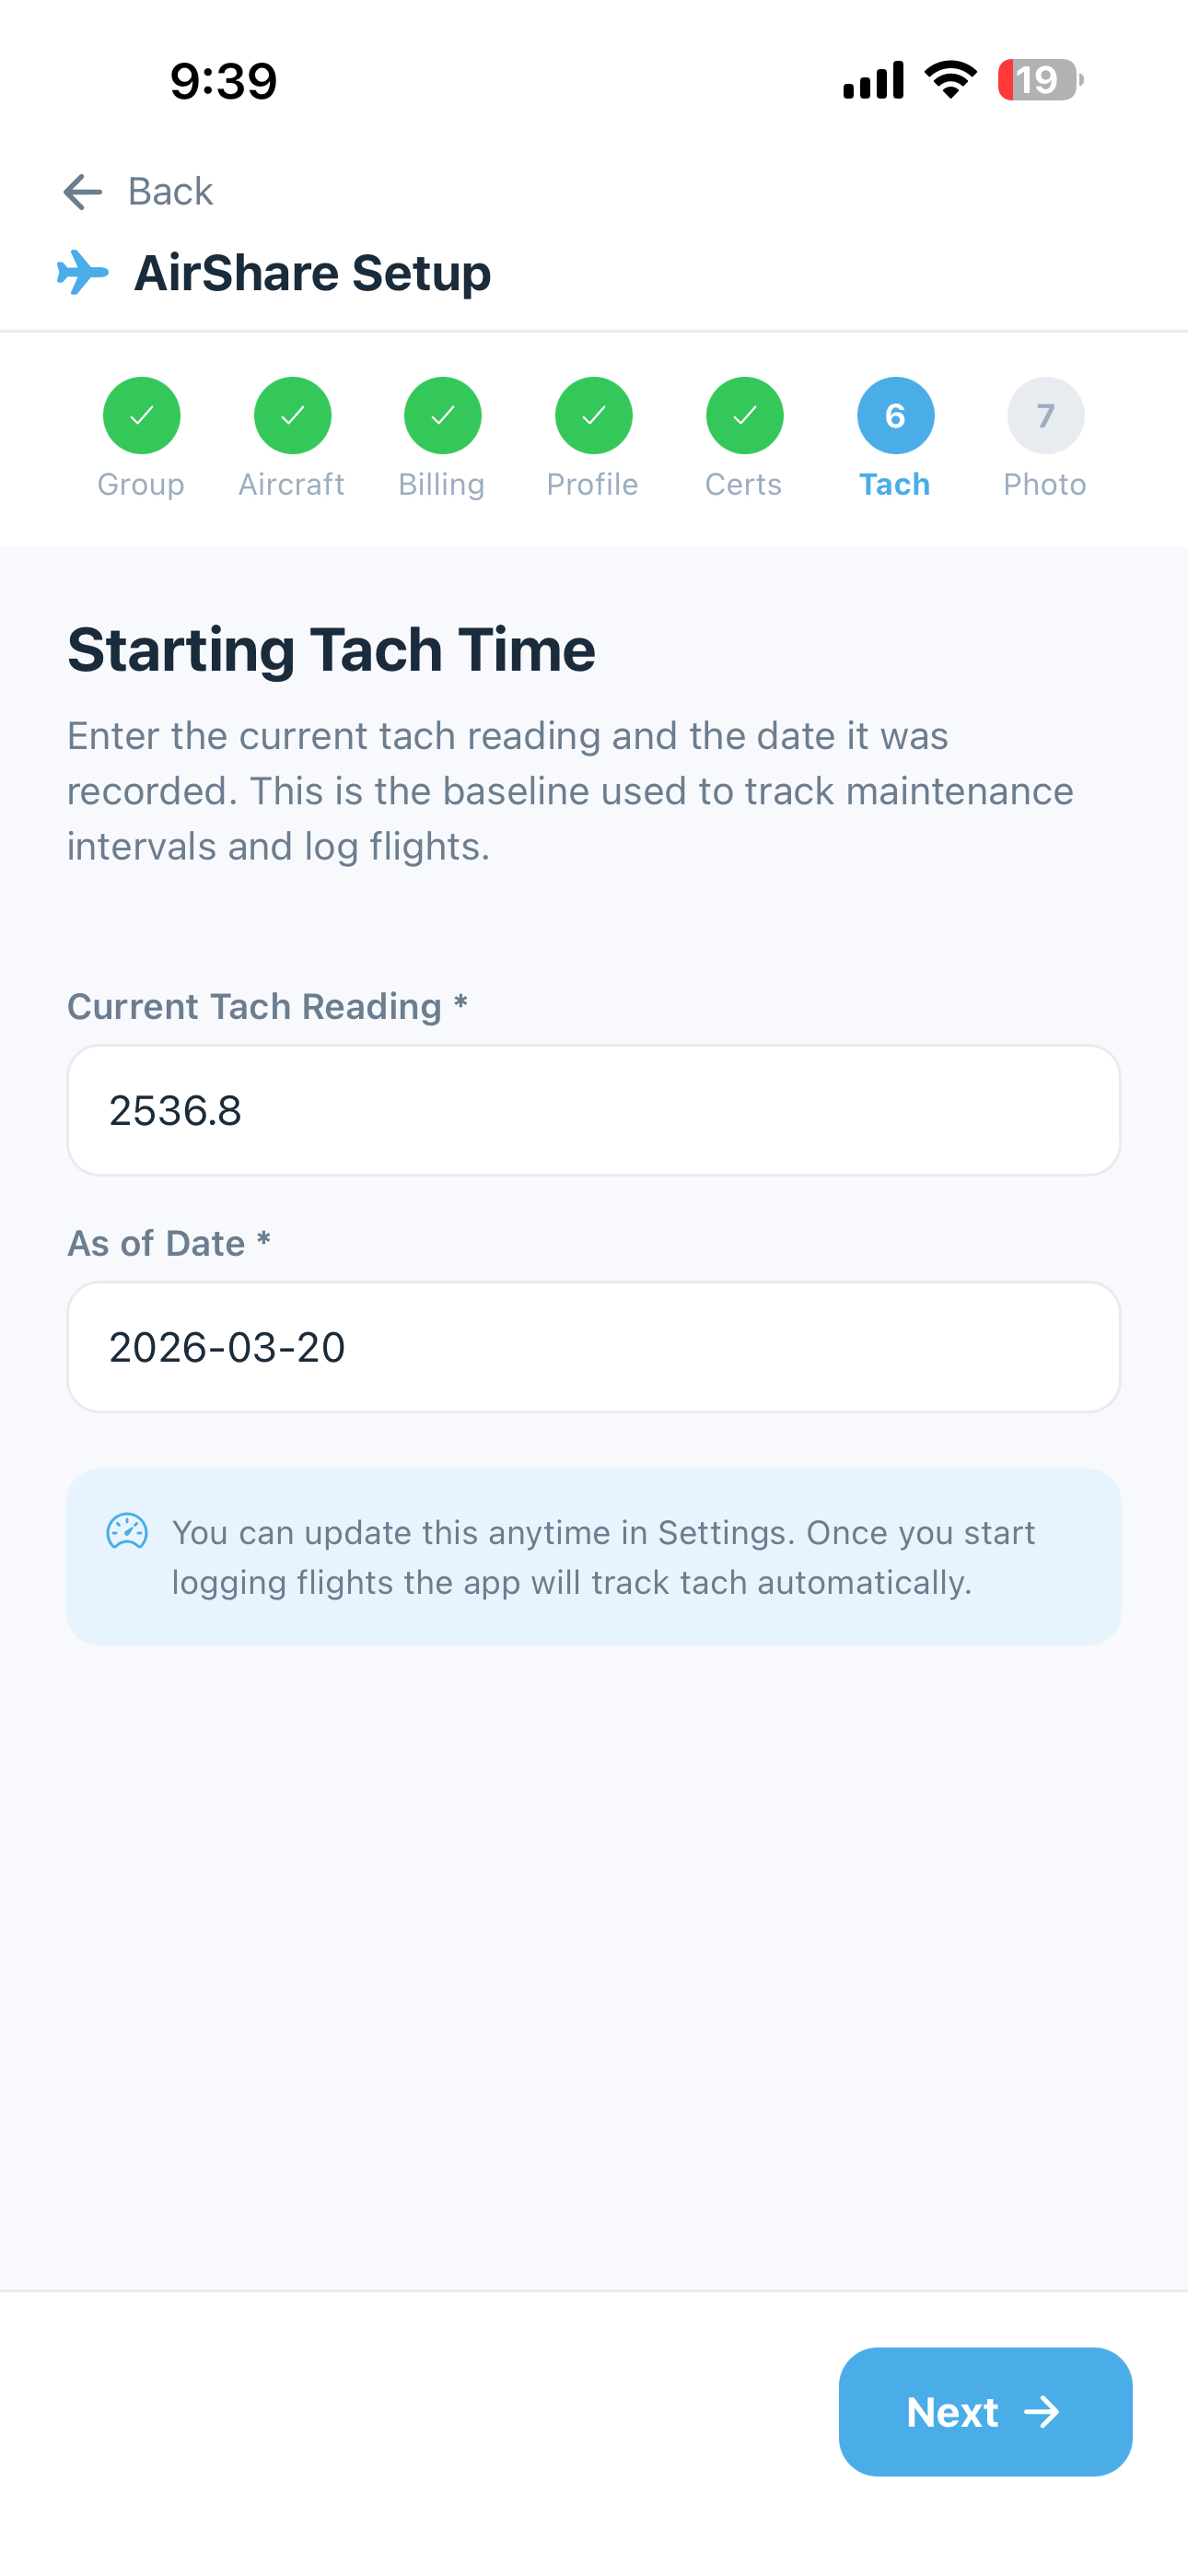
Step 7: Starting Tach Time (paid plans)
This is one of the most important setup steps on paid plans. 5-by-5 maintains an unbroken record of engine tach time across all flights — no gaps, no overlaps. Every flight builds on this starting point.
- Starting tach reading — the tach reading as of a specific date (e.g., 1247.5). This should be the current reading on the aircraft tach at the time you start using 5-by-5.
- As of date — the date this reading was taken
Once set, 5-by-5 uses this as the foundation. When you log flights going forward, each tach-out pre-fills from the previous flight’s tach-in. If you insert a flight between existing flights, 5-by-5 will ask whether you want to shift earlier flights back or later flights forward to maintain continuity — no manual recalculation needed.
Important: If you change the starting tach after flights have been logged, 5-by-5 will recalculate all flight tach values to maintain the continuum. The app will warn you before making this change. Take care to enter an accurate starting value during setup.
On the free tier, the starting tach is stored as a reference point but continuity is not actively managed — you’ll enter tach-in and tach-out manually on each flight.
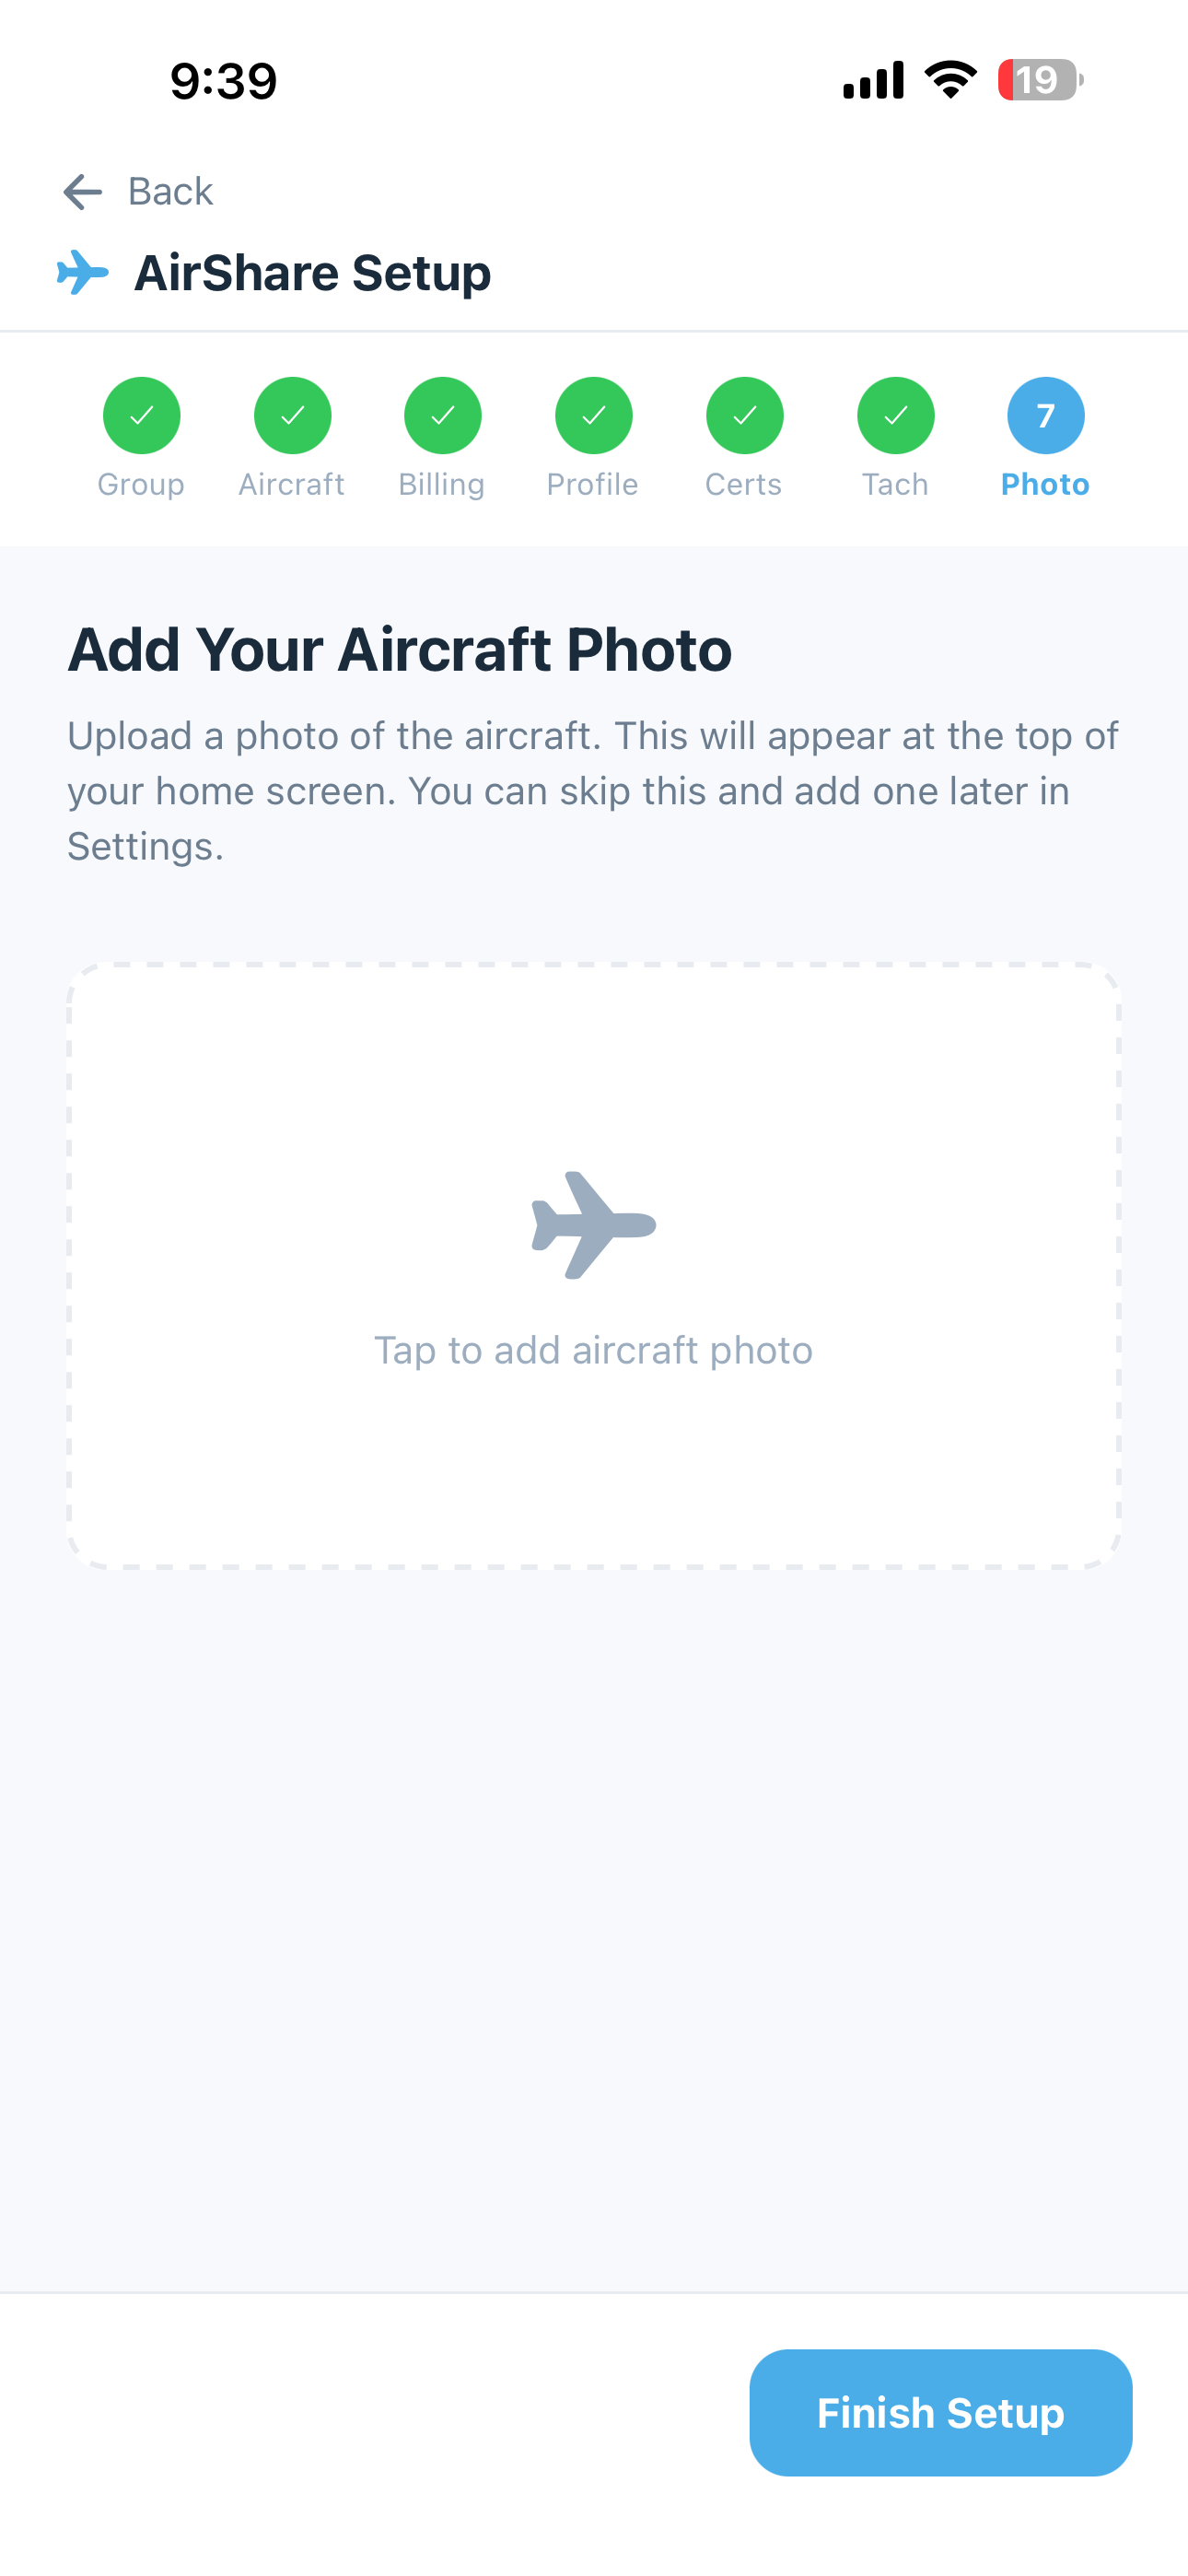
Step 8: Aircraft Photo
Upload a photo of your airplane to use as the default image at the top of the home screen for all members. Each member can set their own personal aircraft photo later in Settings, but this is the shared group default.
Step 9: Confirmation
Review your entries and tap Create Group (or Create Account for Solo) to finish setup. You’ll land on your home dashboard and be ready to start flying.
Before the Wizard: MFA Enrollment
The onboarding wizard above isn’t actually the first thing you do. After verifying your email, 5-by-5 prompts you to enroll Multi-Factor Authentication before you can reach the wizard or the main app. This is a hard gate — there’s no “remind me later.” The reason: 5-by-5 stores aircraft records, member contact info, and group financial data, and a stolen-password attack against any of that is worth blocking.
Enrollment takes about 30 seconds. Because you’re usually setting this up on the same phone running 5-by-5 (which can’t scan its own screen), the primary path is to copy the setup key and paste it into your authenticator:
- Open an authenticator app — Microsoft Authenticator, Authy, 1Password, Bitwarden, Apple Passwords, or Google Authenticator all work
- Tap Copy setup key on the 5-by-5 enrollment screen
- In your authenticator, tap to add a new account, choose Enter setup key (or equivalent), and paste
- Your authenticator shows a new 6-digit code for “5-by-5” that refreshes every 30 seconds
- Type that code back into 5-by-5 to confirm enrollment
If your authenticator lives on a different device (an iPad while you’re on iPhone, a desktop password manager, etc.), the enrollment screen also shows a smaller QR code below the setup key — scan that instead, then enter the resulting 6-digit code.
Every future sign-in then requires your password plus a fresh 6-digit code. See Account Security for recovery options if you ever lose your authenticator device.
Recommended: Pick an authenticator app that backs up its secrets to the cloud (Authy, Microsoft Authenticator, or a password manager). Google Authenticator works fine for day-to-day but is more painful if you switch phones without a backup.
After Onboarding: Recommended Next Steps
These aren’t part of the wizard but are worth knocking out in the first few minutes:
Allow-list 5-by-5 Sender Addresses
Add billing@, invites@, maintenance@, and welcome@blueskyapplications.com to your contacts so transactional emails don’t end up in spam. See Email Notifications for per-provider steps.
Connect Your Bank Account (Treasurers on Club plans)
The Finances page in the web app can show your bank balance and actual transactions side-by-side with your planned expenses. Plan a few minutes to walk through Plaid’s secure bank-connect flow — pick your bank, sign in with your bank credentials (5-by-5 never sees them), select which account to connect, and you’re done. See Bank Integration for the full walkthrough.
Set Up Online Payments (Club plans)
Let members pay monthly invoices by ACH or card instead of writing checks. Connect a Stripe account from the web dashboard. See Online Payments for the full flow.
Invite Your Mechanic (Paid plans)
Give your A&P or IA limited access to maintenance and documents — no flight or financial data. See Members & Roles > A&P Mechanic Access.
Import Historical Flights
If you have years of flight data in ForeFlight, Garmin Pilot, or a spreadsheet, you can bulk-import. See Importing Data.
Tip: Everything you entered in the wizard can be changed later from the Settings screen. The goal of onboarding is just to get you up and running quickly.